I have been pinning eyeshadow looks and tutorials on Pinterest for YEARS but I realized that I haven’t actually tried any of the looks out…so, I’ve decided to challenge myself, by selecting my favourite pins to discover:
- If I can create this look with my existing makeup.
- If this look works well on my/a different eye shape and/or colour.
- How helpful the step by step images are (if any).
- What tips can I provide my readers to help you achieve this look.
Today’s challenge…
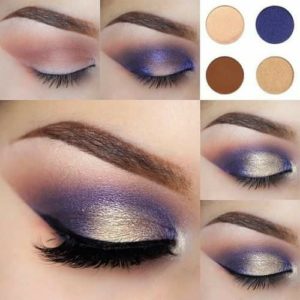
No matter what skin tone or eye colour you have, purple is flattering on everyone! That’s why I selected today’s challenge, which I have entitled “Purple Pizzazz”.
On a day-to-day basis, I do wear touches of purple to line my lower lashes or add a pop of colour on the outer eye corner…but nothing this intense.
So although I was confident that the colours would look lovely, the big question was “would this be wearable” or just something artistic to look at online…I’d never know unless I gave it shot – so I did!
The Reveal
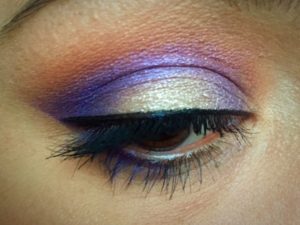 Overall, I like the look and am proud at how similar it looks to the pinterest photo! Was it my favourite look that I have created? No…but it was quite pretty.
I did feel a little “over done” (ie. too much eye shadow for a daytime look) but that was just a comfort zone thing. This could, however, be something I rock in the future for a date night or ladies night out.
This look was super simple to create and the step-by-step image was quite helpful. As the eyelid is shut in the original photo, there was no direction of what to do on the lower lashes, so I just added a little purple below the lower lash line and completed it with a bit of mascara.
Trying to follow the Pinterest steps, here’s how I created this look:
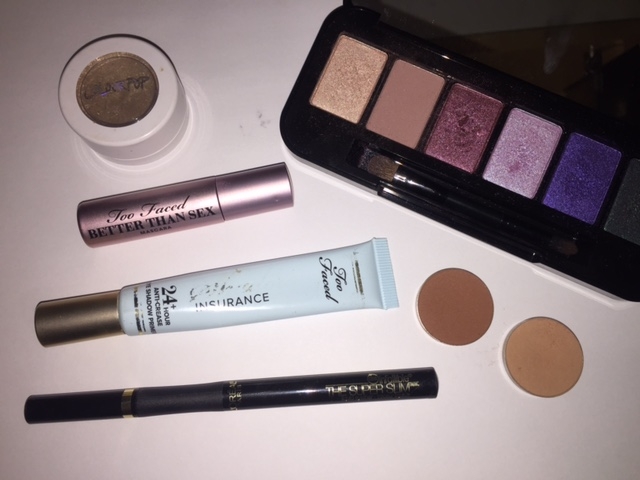
(1) I dabbed Too Faced Shadow Insurance Primer all over my lid and let it dry for a minute or two to prime the area.
(2) I applied Makeup Geeks eyeshadow in Creme Brulee (medium sand color with a soft matte finish) and Cocoa Bear (matte reddish brown) in and above my eyelid crease with a medium fluffy crease brush. And then blended, and blended, and blended.
(3) In the inner and outer corners of my eyelid, I placed Buxom eyeshadow in Purple Posh (shimmering violet), from my Customizable Buxom Shadow Palette, with a small dense eyeshadow brush. I then drew a thick line with the same brush and purple colour from the outer to inner corners of my upper lid and blended it downward.
(4) Using another dense shadow brush, I applied Buxom eyeshadow in Champaigne Buzz (shimmering pearl), from my Customizable Buxom Shadow Palette, to the centre of my lid. I started about 33% in from my outer corner working my way to the inner corner… leaving a tiny pop of purple in the corner. And then I blended it a bit on the outer edges.
(5) With my middle finger, I dabbed a bit of Colourpop eyeshadow in Fringe (shimmering champagne with gold and silver glitter) on top of where I placed the Champaigne Buzz to add some subtle-ish sparkle.
(7) To finish the look, I applied L’Oreal Infallible Super Slim Eyeliner (felt tip) in black on my upper lash line, Buxom Purple Posh with an angled brush under my lower lash line, and Too Face Better then Sex Mascara on both my upper and lower lashes.


Application Tips
- To create the precise sharp shadow finish on the outer lid, I applied a little scotch tape diagonally from the outer end of my eyebrow to the outer corner of my eyelid before applying eyeshadow.
- When using bright colours, it’s better to apply a little shadow at a time and build the colour to avoid mistakes and test your level of comfort with the brightness.
To complete my look, I first applied Smashbox Photo Finish Foundation Primer all over my face to make sure my foundation lasted all day. My foundation of choice was L’Oreal Infallible Pro-glow Foundation (check out my review) applied with a Beauty Blender, followed by Maybelline Instant Age Rewind Concealer. I also used Benefit Gimme Brow Volumizing Gel and QUO Brow Focus in Brunette to darken my brows.
I then appled Too Faced blush in Baby Love on the apples of my cheeks and blended it up toward my temples, bronzer from Maybelline Master Contour Palette (check out my review) slightly under my cheek bone and along the outer edge of my face, Mary Lou Luminizer highlighter from theBalm lightly above my cheek bones, and Colour Pop Ultra Matte Liquid Lipstick in Beeper on my lips (check out my review).


What do you think?
Any eye shadow looks or tutorials you’d like me to try out? If so, link them below in the comments section![]()
Twitter | Instagram | Pinterest | BlogLovin
(For full disclosure, please note that a couple of the links are shopstyle affiliate links. There are many retailers I could have linked for info on the same products, so I figured why not link ones that reward me for selecting them so I can buy more products to review for you! I want to re-assure you that the featured products were not selected on that basis. )